It’s been already two months since we released the Product Builder module. We did it without any kind of user documentation. No surprise that the only issue we’ve got on Drupal.org was something like: “Guys, I need this module, but have no idea how to use it”. It was a God’s sign and I had started working on a set of tutorials, which will explain how to build different types of customizable products. I begin with a pizza builder because I already have all the assets from the Drupal Camp in Wroclaw.
Overall, I am planning to have 5 tutorials with different types of products:
- Custom pizza builder
- Photoframe with prices calculation via rules
- Car configurator with a user view snapshot
- Business cards with prices per quantity
- Integrating a third-party field type into the product builder.
Prerequisites
To start configuring your first customized product we need to have at least a minimally configured Drupal Commerce website. As prerequisites, we should have a store and a product type.
If you don’t have one configured, I suggest you can start with one of the dozens of Commerce 2.x tutorials for Drupal 8. Personally, I recommend using official documentation, though it can be a bit difficult for some newbie developers.
Guide
Step #1
Assuming you already have a clean Drupal 8 installation with configured Commerce 2.x on top of it, the next thing you need to do is to download and enable the "Product Builder" module. I strongly recommend using composer for it.
composer require drupal/product_builder
After that just enable it using Drush or usual admin UI.
Step #2
We need to create a “Product Builder Type” (bundle) for the pizza constructor. In order to do that, go to Structure > Product Builder Type and click on “Add” button. Then just fill in the fields as usual. The form is quite simple and contains only a “Name” field. I use “Pizza” as a builder name.
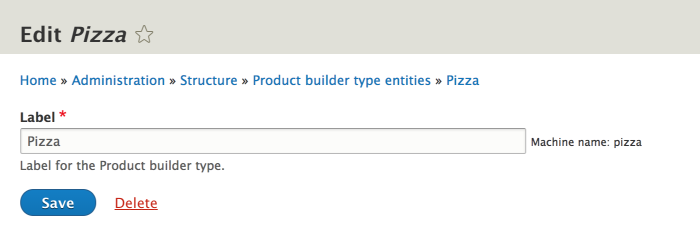
We won’t change any fields settings for the entity yet. For now, this entity remains empty.
Step #3. Product type creation
Now, it’s time to create a Product type via Commerce configuration.
Go to Commerce > Configuration > Product types and create a new one. I would call it “Pizza product”. All the entity settings you may change as you wish. Once the product is created, we need to attach the “Product Builder” entity to the product type. This is pretty simple and can be configured through the special “Add to cart” widget.
While you are on “Product types”, select “Manage display” for the created product type (pizza product in my case). For the “Variations” field you need to switch “Format” select to “Add to cart form with Product Builder”. This formatter allows injecting a separate step for the product configuration.
After that, click on a tiny gearbox for the “Variations” field. In the formatter configuration form select a Product Builder Bundle of the entity type created on step #2.
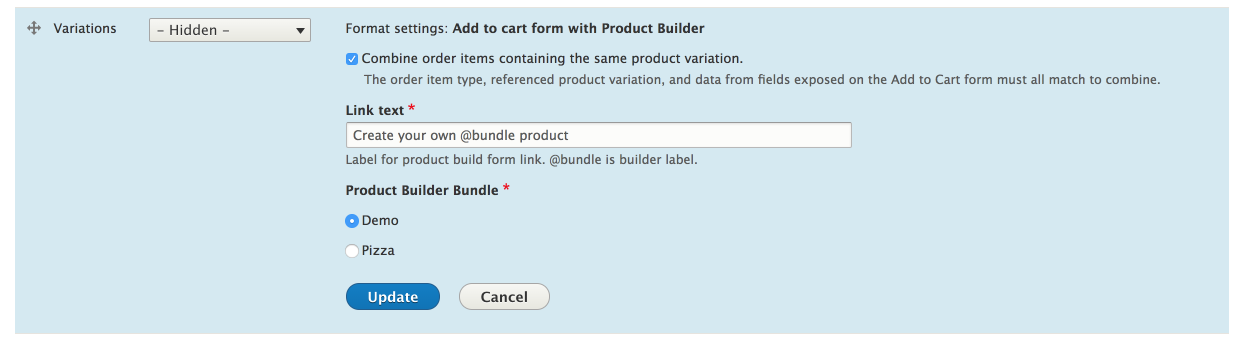
In “Link text” field you can adjust the text to whatever fits your design. This text is being used for the “Customize” button shown next to “Add to cart”

Since we’re building a pizza builder, it’s worth to add an image field for the product variation. Product variations fields are here: admin/commerce/config/product-variation-types/default/edit/fields.
It will contain a prepared background image of pizza base. In step #5 we’ll proceed with a “Topping” field which will be used as an overlay for the pizza base. I called this field “Background”.
Step #4. Setup product attributes
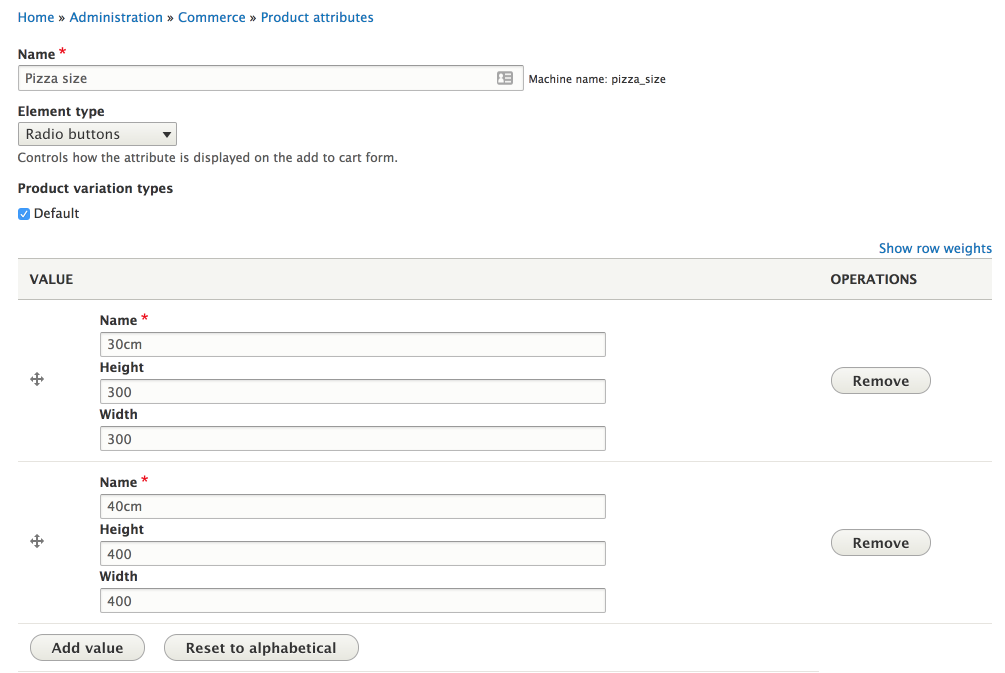
In order to manage the pizza size, I would create a set of Product attributes. Go to Commerce > Product attributes > Add. Create an attribute with a “Pizza size” name. I would select “Radio buttons” for the “Element” field. And don’t forget to assign this attribute to you product variation type.
Once it is done, we need to add width and height fields. These fields are going to be used for builder preview CSS variables. The whole attributes form should look like the screenshot below:
Finally, when adding a new Pizza product, my form looks like the following:

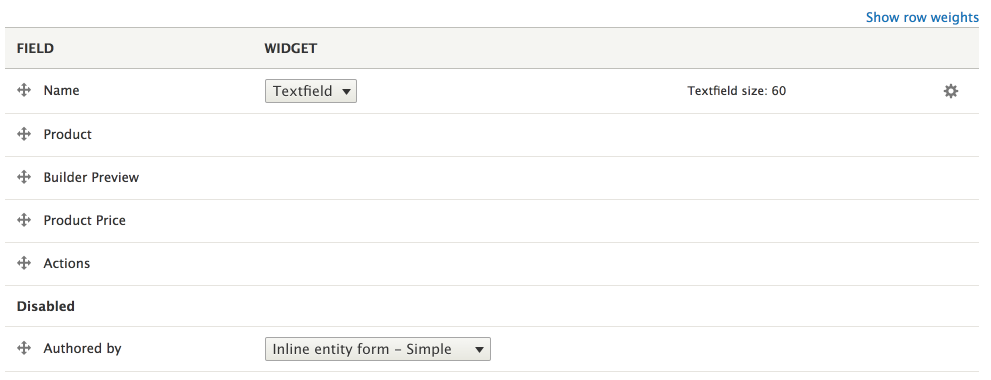
Step #5. Setup product builder fields
Now, when all entities are created and referenced, we need to add fields we’re going to use in a builder itself. For this example, we’ll use only two fields. “Topping” (for some additional tomatoes and mushrooms) and “Name” (to set a name for our piece of high cuisine).
“Name” field exists in the entity itself, so I skip its description.
It’s better to set the “Topping” field as a taxonomy term reference. This way we’ll be able to extend topping with additional fields. For example price, weight or image.
I’ve added the Topping Background image to the “Toppings” taxonomy vocabulary. On a later stage, I’m going to use this field for a dynamic pizza preview.
I set the Topping field to have “unlimited” values. It’s always good to be able to mix the pizza add-ons.

At this point, I would step out and create a sample product and taxonomies to check the progress. Personally, I’ve created a Pizza Zanzarra product with two variations: 30 cm and 40 cm. Both have the same “Background” field.
As “Topping” taxonomy terms I’ve created the following items:
- Tomatoes
- Salami (for those who want some meat)
- Kittens (everybody loves kittens, no matter what)
I’ve used following image for the “Topping Background” field:

Product page looks like this (note: I’m using Bartik theme without any additional stuff):

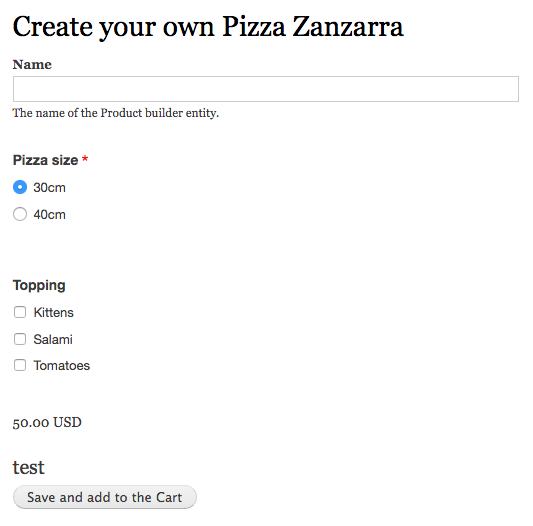
When clicking on “Create your own Pizza”, you’re being redirected to the builder page. If you followed my steps, it will look similar to the screenshot:
Step #6. Enable the product builder preview
Now, it is my favorite part — product preview.
Product builder allows building a dynamic preview of the product. The concept of the preview feature is quite simple: it introduces a new pseudo field — “Product Preview”. It’s just an HTML template which is being rendered using all variables available in the form. The Product Preview is being refreshed on every form changing. This way we achieve interactivity.
As a start, you need to enable the “Product Builder Preview” module and ensure that the “Preview” field is visible in the form. Check the Manage Form Display (admin/structure/product_builder_type/pizza/edit/form-display), it should look similar to the screenshot below:
I recommend you to review the “Product Builder Variables” fieldset below the “Manage Form Display” table. It contains a recursively built list of variables available in the “Builder Preview” template. Basically, you can access any property of any referenced entity. In our case, it will be very useful for the “Toppings” field.
In my case, the list of variables looks like this:
 state_variables.id
    state_variables.langcode
    state_variables.type
    state_variables.user_id
    state_variables.user_id.uid
    state_variables.user_id.langcode
    state_variables.user_id.preferred_langcode
    state_variables.user_id.preferred_admin_langcode
    state_variables.user_id.name
    state_variables.user_id.mail
    state_variables.user_id.timezone
    state_variables.user_id.status
    state_variables.user_id.init
    state_variables.user_id.roles
    state_variables.user_id.roles.0
    state_variables.user_id.default_langcode
    state_variables.user_id.user_picture
    state_variables.name
    state_variables.status
    state_variables.default_langcode
    state_variables.field_topping
    state_variables.field_topping.0
    state_variables.variation
    state_variables.variation.variation_id
    state_variables.variation.langcode
    state_variables.variation.type
    ...
    state_variables.variation.attribute_pizza_size
    state_variables.variation.field_background
Step #7. Customize the preview template
To make preview look like real pizza, we need to customize twig template a bit. We need to build a set of overlayed elements: pizza base + all toppings. See the image below:

As a base template, I recommend using the one shipped with the module “product-builder-preview-element.html.twig”.
To proceed, copy it to your theme folder and rename it match the following pattern
product-builder-preview-element--[product-builder-bundle-machine-name].html.twig
In my case, it is a product-builder-preview-element--pizza.html.twig file.
The content of the file is below:
<h2 class="pizza-name" style="text-align:center;">
  <b>
    {{ state_variables.name }}
  </b>
</h2>

<div class="pizza-base"  style="
      background: url('{{ state_variables.variation.field_background }}');
      background-size: cover;
      width: {{ state_variables.variation.attribute_pizza_size.field_width }}px;
      height: {{ state_variables.variation.attribute_pizza_size.field_height }}px;
      position:relative;
">

{% for topping in state_variables.field_topping %}
  <div class="pizza-layer" style="
          background: url('{{ topping.field_topping_background }}');
          background-size: cover;
          width: 100%;
          height: 100%;
          position:absolute;
          "></div>
{% endfor %}

</div>
Explaining the used variables:
state_variables.name — Default name field of Product Builder entity.
state_variables.variation.field_background — see step #3
state_variables.variation.attribute_pizza_size.field_width and state_variables.variation.attribute_pizza_size.field_height — see step #3. These fields contain a value in pixels for the preview size
state_variables.field_topping — see step #5. This field contains an array of taxonomy terms
state_variables.field_topping.0.field_topping_background — recursively retrieved “Topping Background” field from the Topping taxonomy term.
Step #8. Fine tune the “Product Builder” form using the “Field Group” module
In order to make the form look more consistent, I suggest wrapping fields into separate fieldsets. Fortunately, the module works just perfect with the “Field Group” module and you can arrange everything using the interface. I’ve created two fieldset groups: “Build” and “Results”. Form configurations look like the screenshot below:
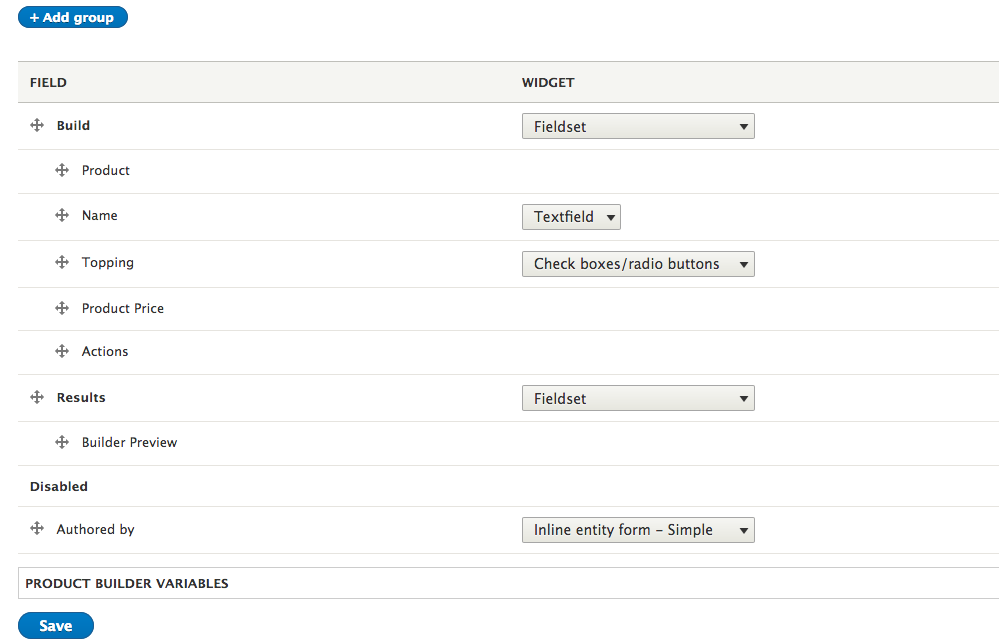
The product builder looks like the following:
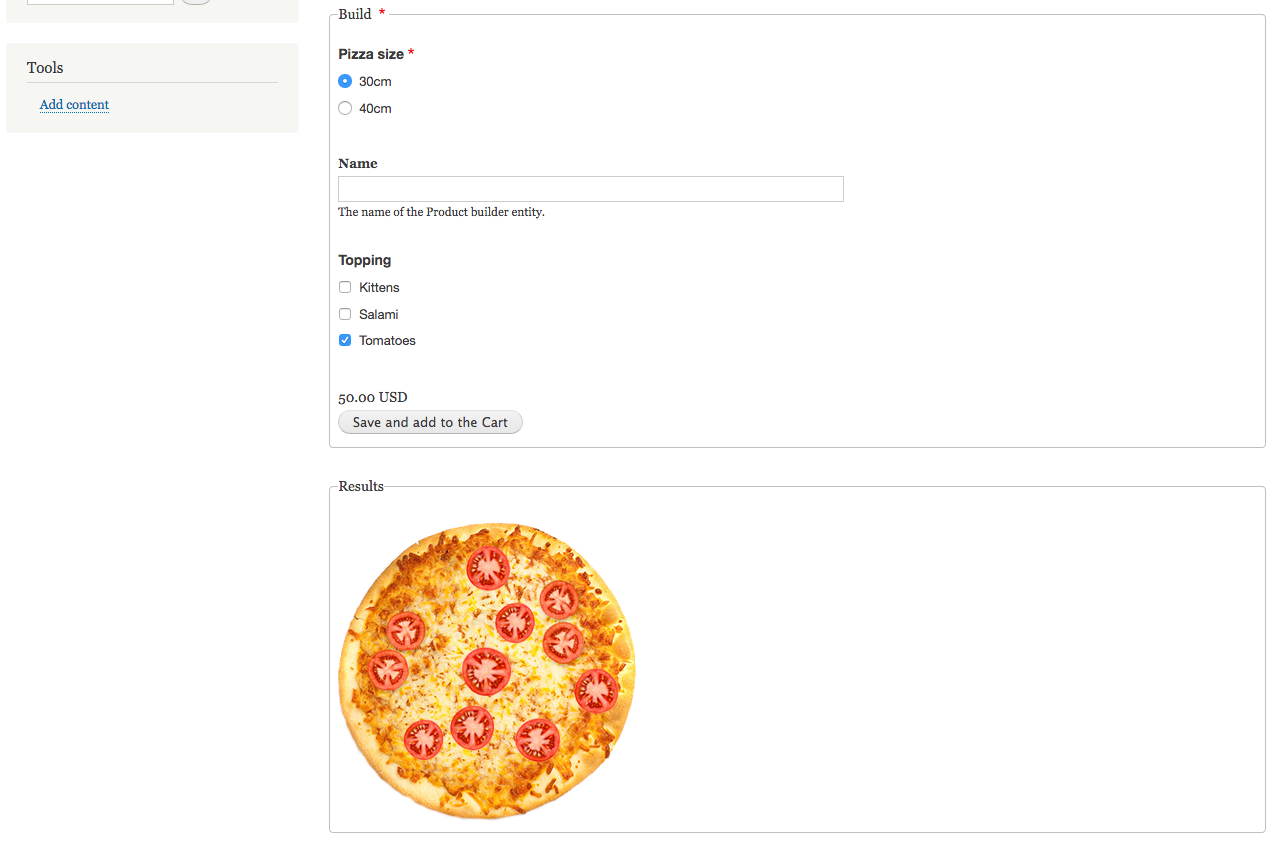
With a couple of CSS lines, you can make this form a two-column layout. Similar to what we have achieved in one of our projects:

Result overview
Always good to review the final result of hard work. Finally, we have the most useful pizza-builder ever. Now I have a feeling like opening own pizza delivery — “Pizza Zanzarra”!
Feel free to play around with it here: http://demo.zanzarra.com/pizza

Conclusion
Preparing this tutorial is such a relief. We planned to start preparing a documentation months ago. And probably, we would never start. Until, fortunately, Wisamx explicitly asked us to provide at least some sort of user guide for it.
We planned a set of articles for different industries and types of products. And if it goes well, we’ll prepare a separate article on module’s API and development strategy.
If you are not feeling like building your own customizable product today, you can always play around with some real-life examples on our printing site.