
How to implement Open AI text generation capabilities in Drupal

Mar 11, 2024
AI
Introduction

Just a decade ago the concept of Artificial Intelligence felt for me like something that will appear far away into the future, like something distant, unrelated. However, just in the last few years I witnessed a sudden shift from being far from everyday life, to being something ordinary. 

I can open a page on the website and literally ask an AI model different questions on the topics I’m interested in. Yeah, I’m talking about the well-known ChatGPT. You can use it to answer questions, analyze text, draft a document, even generate an image based on the description.

Certainly, it would be really a great thing to be able to use these capabilities in the other web services. Open AI, the same company, who created ChatGPT has its own API, which provides AI to use for different purposes. 

And obviously, such capabilities have its own usage in the Drupal CMS. So that’s why today, I’m going to demonstrate how the Open AI text generation capabilities can be used in Drupal 9 Content Management System. And I’ll do it by integrating Open AI Chat Completion API with Drupal.

Integration preparations
  • The request to the Open AI requires a generated API key. In order to generate one you need to own an Open AI account. Probably, you already have one, if you used ChatGPT in the past, but there may be a problem. 
  • As of now, after you register an account, for the first 3 months you receive 5$ for free on your account to make requests to the Open AI API. So if you registered an account before, you may need to pay a few dollars to activate an ability to process requests for your account.
  • Next you need to go to the API section in the menu and generate a secret key by clicking on the “Create new secret key” button. Copy this key, you will need in the future to insert in this request.

AI

  • Next thing you need to do is choose the Open AI model. Here you can find the list of currently existing models, which provide different functionality. My focus today will be on GPT-3.5 models and I will use the gpt-3.5-turbo model for the implementation. As of now, this model points to the newest version of gpt-3.5-turbo model, but you can always choose and set the model from the list of provided models.

And that is all you need to do for the preparation. Let’s move on to the next section, the request itself.

The Open AI API request

Below you can see the basic example, how the Open AI request look like:

Let’s analyze the request. As you can see on the image the main callback, which is used for the request generated API key is added as a one of the request headers, and a selected model is added in the request body and is sent under the “model” key.

The main component of our request is the messages parameter. Here are stored messages that are sent to the model to analyze and provide an answer. Each time the request is sent, a new session is created with the model, it does not know/remember what you asked in the previous request.

But you still can build a dialog with AI models. To provide a model with a context of previous requests you need to add all the messages sent in previous requests in the correct order, before adding your new message as the last one. That is how the request looks like, but what does the response look like? The example of the response you can see below:

So the response contains a JSON document, from which the required information can be extracted. The main data from the model response to the messages can be found in choices->message->content section of the document. Other most notable parameters: 

  • “Created” - timestamp, when the response was created.
  • “Model” - contains name of the model, which was used to generate response.
  • “Usage” - contains information about the amount of token used to generate a response. This can be used to analyze the cost of the request and if your model maximum token capacity is enough, or you need a model with a bigger capacity.

More information about parameters of the request and response can be found here.

So that is the main information about request and response to the Open AI. Now let’s move onto the implementation section.

Open AI request implementation in Drupal

The best way to implement new functionality in Drupal is the modules. So in order to implement OpenAI I need to create a module. Below you can see a typical Drupal 9 module info file.

File open_ai_integration/open_ai_integration.info.yml

name: Open AI integration
type: module
description: Open AI integration.
package: Custom
core_version_requirement: ^8 || ^9
configure: open_ai_integration.settings_form


Next, let’s create a configuration form. It is a good way to store the settings required to use in Drupal 9 in the configurations, instead of writing them directly in the code. And the first thing we need to create is permission, so the form can be accessed only by the users we want to allow to. Here is the permission implementation:

File open_ai_integration/open_ai_integration.permissions.yml

administer open ai configuration:
title: 'Administer Open AI configuration'


Next in Drupal 9 in order to implement a form, it is a good idea to create a route, by which you can access this form. It is not always a required thing, but in our case it is a necessary step, especially because we already used the name for the new form route in the module info file. Here’s the implementation:

File open_ai_integration/open_ai_integration.routing.yml

open_ai_integration.settings_form:
 path: '/admin/config/system/open-ai'
 defaults:
   _title: 'Open AI settings'
   _form: 'Drupal\open_ai_integration\Form\SettingsForm'
 requirements:
   _permission: 'administer open ai configuration'


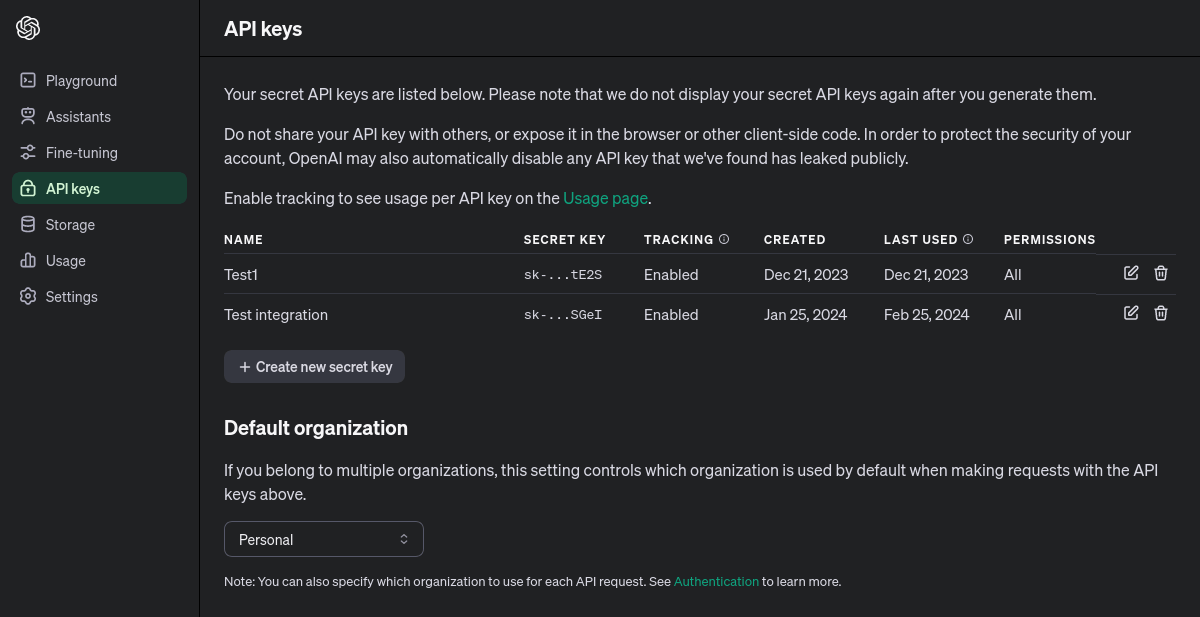
And for the last, after all the preparation, I can create the form itself. Firstly, it is a good idea to decide which settings need to be saved. I decided to save the API url, API key and model. All values put into the fields are then saved, using the Drupal configuration system and now can be transported between different environments. You could already see the name of the class I used for the form creation in the route configuration, so here’s the whole form implementation:

File open_ai_integration/src/Form/SettingsForm.php

<?php

namespace Drupal\open_ai_integration\Form;

use Drupal\Core\Form\ConfigFormBase;
use Drupal\Core\Form\FormStateInterface;

/**
* Configure Open AI settings.
*/
class SettingsForm extends ConfigFormBase {

 /**
  * {@inheritdoc}
  */
 public function getFormId() {
   return 'open_ai_integration_settings';
 }

 /**
  * {@inheritdoc}
  */
 protected function getEditableConfigNames() {
   return ['open_ai_integration.settings'];
 }

 /**
  * {@inheritdoc}
  */
 public function buildForm(array $form, FormStateInterface $form_state) {
   $form['api_token'] = [
     '#type' => 'textarea',
     '#required' => TRUE,
     '#title' => $this->t('OpenAI token'),
     '#default_value' => $this->config('open_ai_integration.settings')
       ->get('api_token'),
   ];

   $form['api_url'] = [
     '#type' => 'textfield',
     '#required' => TRUE,
     '#title' => $this->t('OpenAI API url'),
     '#default_value' => $this->config('open_ai_integration.settings')
       ->get('api_url'),
   ];

   $form['model'] = [
     '#type' => 'textfield',
     '#required' => TRUE,
     '#title' => $this->t('OpenAI model'),
     '#default_value' => $this->config('open_ai_integration.settings')
       ->get('model'),
   ];

   return parent::buildForm($form, $form_state);
 }

 /**
  * {@inheritdoc}
  */
 public function submitForm(array &$form, FormStateInterface $form_state) {
   $this->config('open_ai_integration.settings')
     ->set('api_token', $form_state->getValue('api_token'))
     ->set('api_url', $form_state->getValue('api_url'))
     ->set('model', $form_state->getValue('model'))
     ->save();

   parent::submitForm($form, $form_state);
 }

}


Next, let’s implement the method, which will allow us to make a request to the Open AI API. In the Drupal 9 it is generally a good idea to use services, when creating functionality, which could be used globally across the Drupal website. So here’s the implementation of such a service:

File open_ai_integration/src/OpenAiClient.php

<?php

namespace Drupal\open_ai_integration;

use Drupal\Core\Config\ConfigFactoryInterface;
use Drupal\Core\Logger\LoggerChannelFactoryInterface;
use Drupal\Core\Logger\LoggerChannelInterface;
use GuzzleHttp\Client;

class OpenAiClient {

 /**
  * Configuration factory.
  *
  * @var \Drupal\Core\Config\ConfigFactoryInterface
  */
 protected ConfigFactoryInterface $configFactory;

 /**
  * Open AI logger channel object.
  *
  * @var \Drupal\Core\Logger\LoggerChannelInterface
  */
 protected LoggerChannelInterface $loggerChannel;

 /**
  * HTTP client.
  *
  * @var \GuzzleHttp\Client
  */
 protected Client $httpClient;

 public function __construct(ConfigFactoryInterface $config_factory, LoggerChannelFactoryInterface $logger_factory, Client $http_client) {
   $this->configFactory = $config_factory;
   $this->loggerChannel = $logger_factory->get('open_ai_integration');
   $this->httpClient = $http_client;
 }

/**
* Sends https query to the Open AI.
*
* @param array $messages
*   Messages to send array. Example:
*   [
*     [
*        'role' => 'user',
*        'content' => 'Message",
*    ],
*   ]
*
* @return \Psr\Http\Message\ResponseInterface
*   Open AI request response
*/
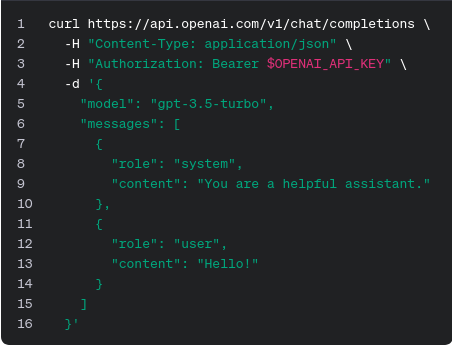
 public function query(array $messages) {
   $open_ai_config = $this->configFactory->get('open_ai_integration.settings');

   try {
     return $this->httpClient->post($open_ai_config->get('api_url'), [
       'headers' => [
         'Authorization' => 'Bearer ' . $open_ai_config->get('api_token'),
       ],
       'json' => [
         'model' => $open_ai_config->get('model'),
         'messages' => $messages,
       ]
     ]);
   }
   catch (\Exception $e) {
     $this->loggerChannel->error($e->getMessage());
     return NULL;
   }

 }

}


This file contains service implementation. Most important of it is the query() function, which is used to send requests to Open AI service. Also, to use API data, stored using configuration settings form, I am using configuration factory.

But, that is not all, that is required. In Drupal 9 you need to define a created class, as a service in order for it to be service. So here’s the YAML configurations, which define the created class as a service:

File open_ai_integration/open_ai_integration.services.yml

services:
 open_ai_integration.client:
   class: Drupal\open_ai_integration\OpenAiClient
   arguments: ['@config.factory', '@logger.factory', '@http_client'] 


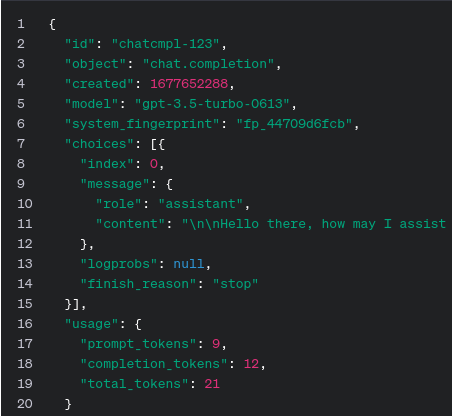
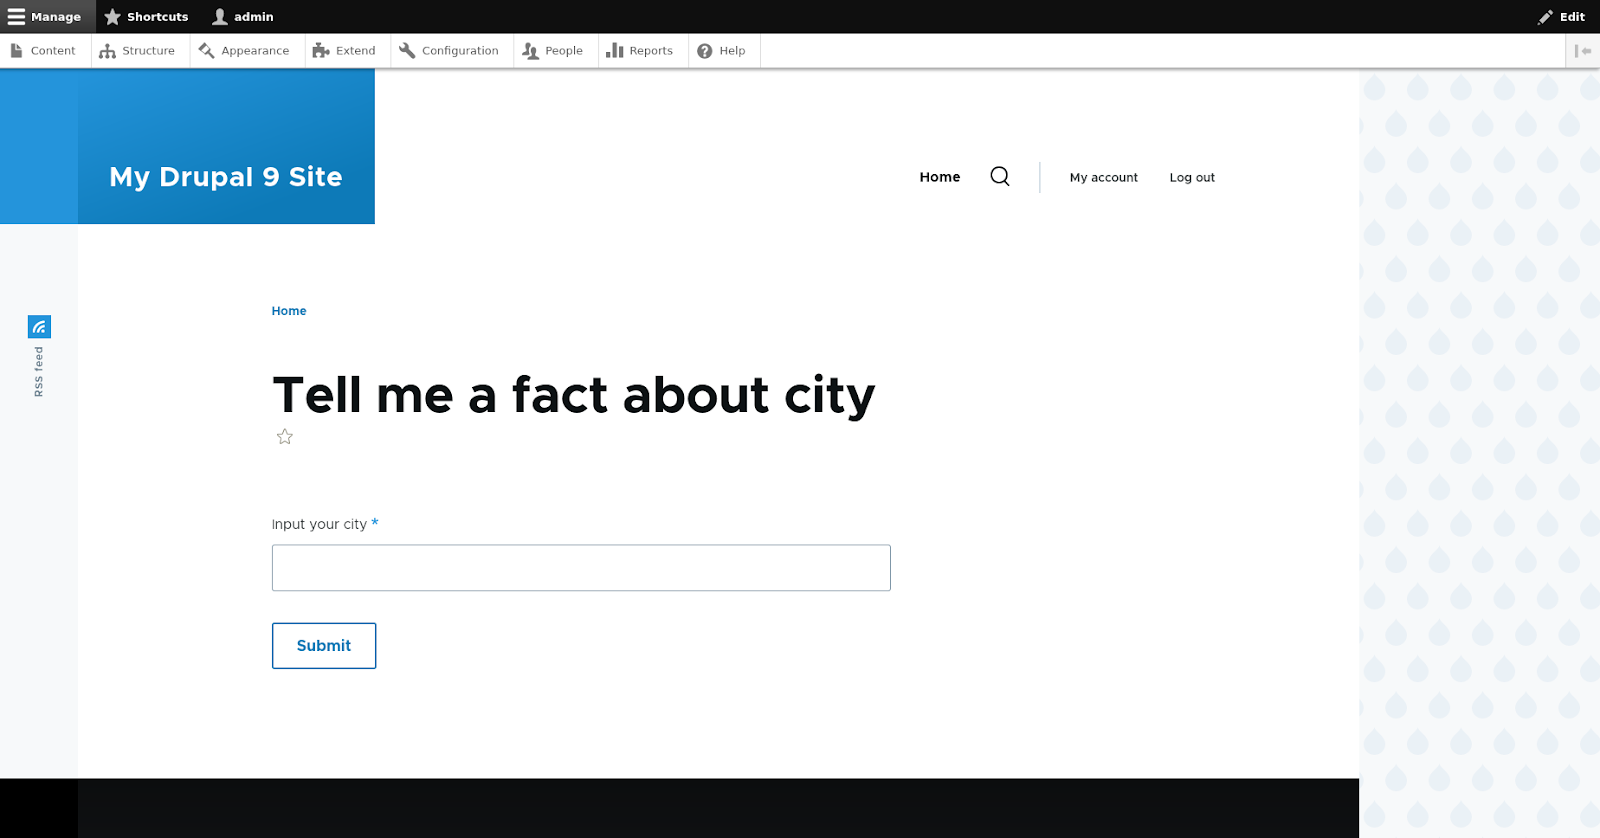
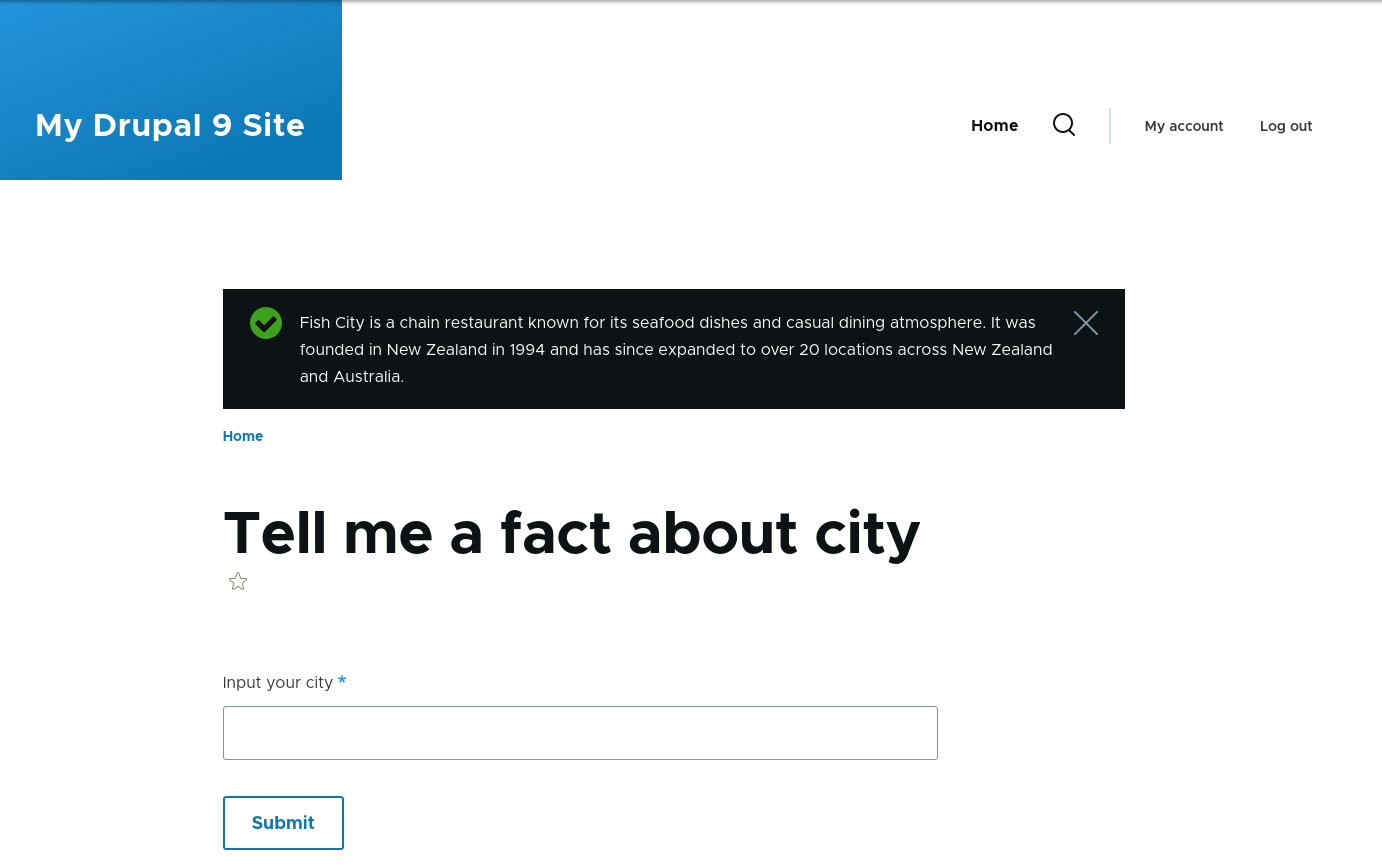
So, that is all that is required to implement a service, which allows us to make requests to the Open AI and receive the answers in Drupal 9. But how exactly will it look? Allow me to show you the example in the next section.

OpenAi Client service usage example

In this section I’m going to demonstrate to you a simple example of the OpenAiClien service usage. It is going to be a simple form, which will have one field and a submit button. When the user clicks the submit button, the server will send a request with data from this field and will display the answer in the system message.

So in order to access the form I need a route. So I created a configuration for a new route and inserted it in the existing route configuration file. The inserted configuration fragment you can see below:

File open_ai_integration/open_ai_integration.routing.yml:

open_ai_integration.example_form:
 path: '/open-ai-example'
 defaults:
   _title: 'Tell me a fact about city'
   _form: 'Drupal\open_ai_integration\Form\OpenAiExample'
 requirements:
   _permission: 'administer open ai configuration'


Next, let’s move onto the Form controller implementation. The form will have one text field and in the result will make a request to the OpenAI with provided data and display the result in Drupal system message.

File open_ai_integration/src/Form/OpenAiExample.php

<?php

namespace Drupal\open_ai_integration\Form;

use Drupal\Core\Form\FormBase;
use Drupal\Core\Form\FormStateInterface;
use Drupal\Core\Messenger\MessengerInterface;
use Drupal\open_ai_integration\OpenAiClient;
use Symfony\Component\DependencyInjection\ContainerInterface;

/**
* Job ad parsing form. First step of cover letter generation.
*/
class OpenAiExample extends FormBase {

 /**
  * Open Ai client service.
  *
  * @var \Drupal\open_ai_integration\OpenAiClient
  */
 protected OpenAiClient $openAiClientService;

 /**
  * Messenger service.
  *
  * @var \Drupal\Core\Messenger\MessengerInterface
  */
 protected $messenger;

 /**
  * @param \Drupal\open_ai_integration\OpenAiClient $open_ai_client_service
  *  Open AI client service.
  */
 public function __construct(OpenAiClient $open_ai_client_service, MessengerInterface $messenger) {
   $this->openAiClientService = $open_ai_client_service;
   $this->messenger = $messenger;
 }

 /**
  * {@inheritdoc}
  */
 public static function create(ContainerInterface $container) {
   return new static(
     $container->get('open_ai_integration.client'),
     $container->get('messenger')
   );
 }

 /**
  * {@inheritdoc}
  */
 public function getFormId() {
   return 'open_ai_example_form';
 }

 /**
  * {@inheritdoc}
  */
 public function buildForm(array $form, FormStateInterface $form_state): array {
   $form['city'] = [
     '#type' => 'textfield',
     '#title' => $this->t('Input your city'),
     '#required' => TRUE,
   ];

   $form['submit'] = [
     '#type' => 'submit',
     '#value' => $this->t('Submit'),
   ];

   return $form;
 }

 /**
  * {@inheritdoc}
  */
 public function submitForm(array &$form, FormStateInterface $form_state): void {
   $messages = [
     [
       'role' => 'user',
       'content' => 'Tell me a fact about ' . $form_state->getValue('city') . ' city',
     ]
   ];

   $response = $this->openAiClientService->query($messages);
   $response_content = $response?->getBody()->getContents();
   $response_content_array = $response_content ? json_decode($response_content, TRUE) : NULL;

   if (!empty($response_content_array['choices'][0]['message']['content'])) {
     $this->messenger->addStatus($response_content_array['choices'][0]['message']['content']);
   }
   else {
     $this->messenger->addError(t('Error! Response from AI service is incorrect! Please, notify the administration, so the could investigate the case!'));
     $this->logger('open_ai_integration')->error('Error, when decoding JSON response. JSON document content: ' . $response_content);
   }

 }

}


In the provided example I ask the user to input the name of the city, so the system uses the name of the city to ask Open AI the question about this city and displays the response as the Drupal system message. Also, I added error handling, so if in the result of service usage the NULL is returned, the system will log this error and display an error message. Let’s see how it works.


On the provided screenshot you can see what the form looks like. Now I need to enter the city name in order to receive a response, but let’s make it slightly more interesting and see the reaction of the Open AI, when the user enters a not so expected city name. Let's use city name "fish".


And here is the answer. And also here is one of the most important issues you must remember about writing a message to OpenAI, which by the way has a generally used name - prompt. Always, check the prompt and change it according to your needs, because otherwise you can see unexpected results, like in the current example, where we asked for information about the city and received information about the chain restaurant. And believe me this is the most innocent unexpected response you could receive.


Conclusion

In conclusion, I want to say thank you for reading the article. I hope it provided you with enough information to implement Open AI Chat Completion API integration in your own Drupal 9 project. Have a nice day ;)